1.General
When you receive it, it contains 2 accessories in total:
- FuserMINI
- Power Adapter:The power adapter that comes with FuserMINI has a Type A plug, so you may need an additional adapter to use it.

2.Introduction
Indicator lights:
- LP-power indicator light
- L1-main PC signal light
- L2-2nd PC signal light
- L3-mainPC and 2ndPC switch signal light
- L4-overlay signal light
Button:
- K1-switch mainPC and 2ndPC screens (short press)
- K2-switch overlay status (short press) adjust the cutout intensity (long press)
Interface:
- Type-C:The Type-C interface is the firmware flash port of FuserMINI, which is used to update the firmware of FuserMINI.
- HDMI: Connect to the main display and display the image processed by FuserMINI on the main display
- HDMI2: Connect to 2ndPC and input the screen of 2ndPC into FuserMINI
- HDMI1: Connect to mainPC and input the screen of mainPC into FuserMINI
3.Installation
Step 1: Ensure that both your 1PC and 2PC are powered on.
Step 2: Connect the DC 12V power supply.
Note: If you press the red Power button at this time without plugging in any other video cables, the LP red light will turn on and the L3 and L4 blue lights will flash. This is normal indicator light behavior.
Step 3: Install the HDMI cables.
- Connect the HDMI interface to your main monitor.
- Connect the HDMI2 interface to your 2nd PC.
- Connect the HDMI1 interface to your main PC.
Note: For the first installation and use, to better ensure the FuserMINI is working properly, please disconnect the cables between your two computers and any other monitors, as well as between your main monitor and other devices before installation. Ensure that during the first use, the video cables of your two computers and main monitor are connected only to the FuserMINI.
Step 4: After installing the FuserMINI, press the POWER button to turn it on. You will see the LP red light stay on, and the L1, L2, L3, and L4 blue lights stay on. At this time, your main monitor should display normally, and the brand and model of the monitor displayed in your main PC’s system should match your main monitor.
4.How to use
- In the display settings of both your PCs, set their resolution and refresh rate to the same parameters, such as 1K240 or 2K144.
- You can use the K1 button to switch between the screens of the different PCs on your main monitor.
- After setting the desired parameters, briefly press the K2 button to enable overlay mode. This will allow you to see the combined display effect, which will depend on the current screen of your second PC.
- Note: The principle of the Fuser is to replace the black areas in the input from IN1 with a transparent layer. If there are no black areas in the IN1 input, its display will overlay the IN2 input. Therefore, all the content you see will be from the IN1 input.
5.Flash
Note: FuserMINI will automatically modify EDIN. You will not need to update the firmware unless you encounter some problems such as incompatibility during the use of FuserMINI.
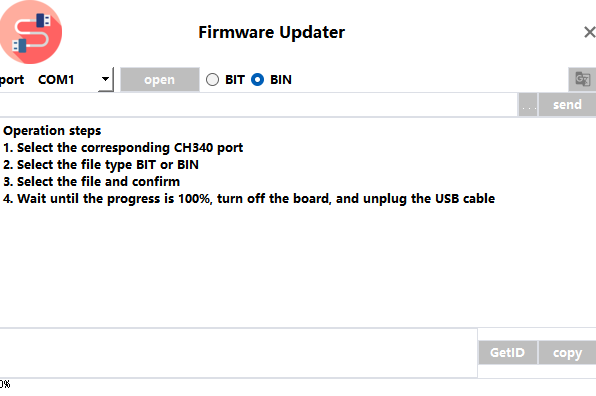

- Connect FuserMINI to Your Computer:
- Use a cable to connect the Type-C interface of the FuserMINI to your computer. (Do not connect the cable to the ports on your computer case, as they are often unstable and may disconnect during the firmware update process, causing damage to the FuserMINI.)
- Download and Extract FuserMINI_Tool:
- Download the FuserMINI_Tool to your computer and extract the files.
- FuserMINI_Tool <<<<Click it to download
- Install CH340 Driver:
- Install the CH340 driver on your computer.
- Verify CH340 Driver Installation:
- After installing the CH340 driver, check the “Device Manager” on your computer under Ports (COM & LPT) to find the corresponding port number for CH340.
- Run FWUPG_v1.2:
- Launch FWUPG_v1.2 and select the CH340 port number you identified from the “Device Manager.”
- Set Firmware Type:
- Set the firmware type to “bin.”
- Select Firmware File:
- Click the “…” button to select the firmware file you want to update.
- Start Firmware Update:
- Click “send” to begin the update process. The indicator light on the FuserMINI will turn green.
- Wait for the update to complete. Once the software indicates that the update is complete in the lower-left corner, use the Power button to turn off the FuserMINI.
- Wait 10 seconds, then use the Power button to restart the FuserMINI.
Note:During the update process, do not disconnect the FuserMINI’s power, unplug any cables, or press the Power button to turn off the FuserMINI. Any of these actions could cause damage to the device.
6.Troubleshooting
Why is my screen not turning on even though all cables are connected?
- Indicator: LP steady red, L3 and L4 blinking blue.
- Solution: Check if the main display’s power is connected. Ensure the HDMI port is connected to the main display. (The issue likely lies with the main display.)
Why is my screen not turning on even though all cables are connected?
- Indicator: LP steady red, L1 and L2 steady green, L3 blinking, L4 off.
- Solution: Use remote control software (AnyDesk) to connect to the 2nd PC and set its resolution to match your main display’s resolution. Set the refresh rate to 60 Hz, then check if the main display is functioning properly. Gradually increase the refresh rate (1K: 60-120-144-240 Hz, 2K: 60-120-144 Hz).
Why is my screen not turning on even though all cables are connected?
- Note: My 2nd PC has an AMD integrated or discrete graphics card.
- Solution: Use remote control software (AnyDesk) to connect to the 2nd PC, then set the image quality to 8-bit in the AMD graphics driver settings.
